In-Depth: Window Installation in High-Performance Walls
The days of uninsulated 2×4 walls loosely covered in a generic house wrap are over. And so are the days of builder-grade windows installed with nails through a flimsy flange over a sloppily applied flashing tape. These traditional construction methods have proven that they don’t result in energy-efficient, water resistant, comfortable, or durable homes.
The construction industry has the responsibility to build better for the health of the building occupants and the health of our planet.
But what does building better look like? Building better looks different based on your local building codes, your project’s specific performance requirements, material and skilled-labour availability in your area, and even your personal preference. While building better may look different due to various factors, it is achieved by following a similar set of guidelines:
- Engage an experienced design and build team, including trades and labourers, with the right mindset, skill set and training
- Have clear performance targets that are prioritized and within budget
- Have a well-thought-out and well-communicated strategy for barrier layers and layer connections
- Intentionally select the most suitable building materials
- Install all building materials as per manufacturer instructions
The result should be a home built with climate-specific high-performance walls. These walls are designed to be highly energy-efficient (airtight and well-insulated), water resistant (mold free), comfortable (thermal and acoustic comfort), safe (non-toxic air quality) and durable (climate resilient) homes.
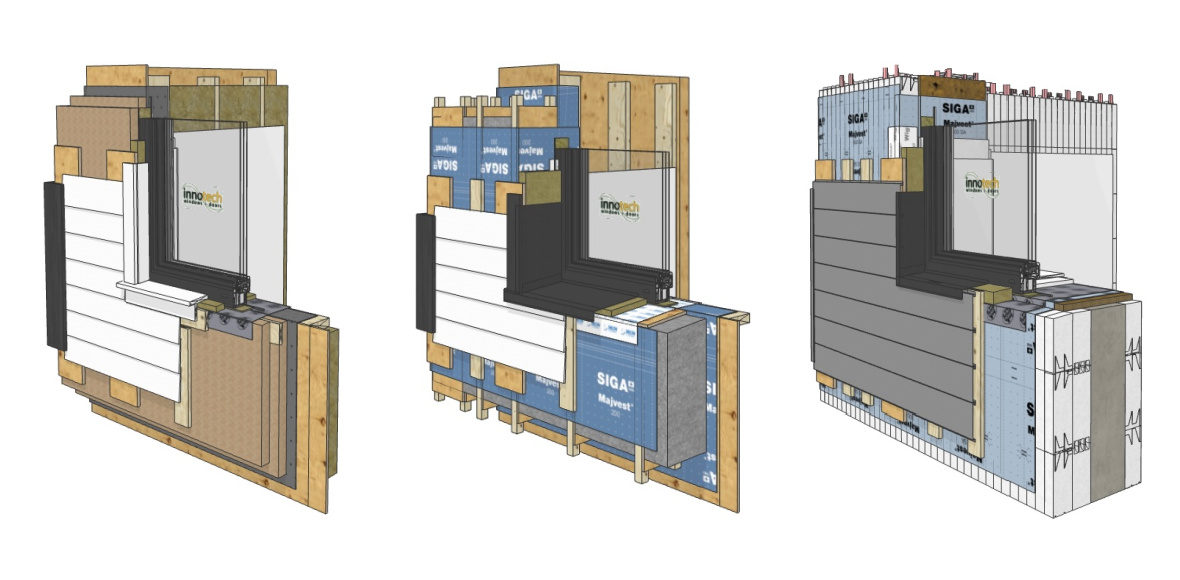
The following wall assemblies demonstrate four wall assemblies that can be utilized to achieve high-performance targets, including net-zero energy and Passive House. They also demonstrate how our windows can be installed within the rough opening and in relation to the barrier layers. Each window installation strategy can be applied to most types of wall assemblies. The most appropriate wall assembly and window installation strategy depends on project-specific factors.
Wall Assembly #1: Split-Insulated Wall – R30

A split-insulated 2×4 wall is a cost-effective, versatile and relatively simple wall assembly. It can achieve a high (and range of) thermal performance with less thick walls using different types of interior and exterior insulation.
The key consideration for split-insulated walls is the insulation ratio between the interior and exterior insulation. The insulation ratio moves the dewpoint within the wall assembly and impacts the risk of condensation. To learn more about the insulation ratio for best practice in design, download the paper Considerations for Exterior and Split Insulated Net-Zero Energy Ready Wall Systems by Morrison Hershfield.
In this split-insulated wall, the balance of insulation is 39% interior to 61% exterior insulation. This balance is ideal for mild climates where the average winter temperature low is -5C or warmer. Colder climates would benefit from additional exterior insulation.
The exterior of the wall features:
- Pro Clima Solitex Mento 1000 3-layer air tight, vapour-permeable weather resistive barrier (WRB)
- 2 layers of Gutex® Multitherm 60 (2 3/8” thick with R8.5) wood fiberboard insulation
- Rainscreen
- Hardie® Plank Lap Siding in Arctic White
The interior of the wall features:
- Rockwool Comfortbatt® insulation (3.5” thick with R14) in the 2×4 cavities
- Drywall
The window installation features:
- Innotech Defender 88PH+ XI window installed off-centre towards the exterior of the wall
- Pro Clima Tescon® Vana 150 at the sill
- Rockwool Comfortbatt® insulation in the installation cavity, and over-insulation at exterior face and the interior face of the window
- Window is installed using the anchoring method with rod & caulk on the interior face for air and water sealing and tape 3 sides (jambs and head) on the exterior for shedding
- Traditional wood trims on all four sides
View the 3D interactive Sketchup model. (Best viewed on desktop.)
View the 3D animation.
Wall Assembly #2: Stud Wall with Larsen Truss – R33
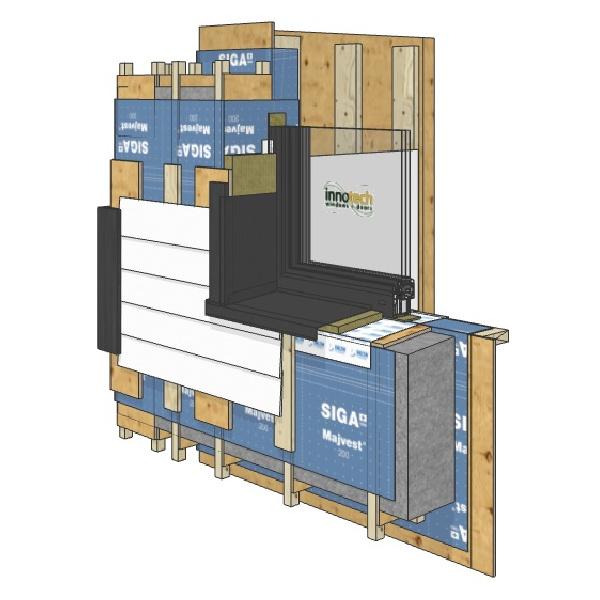
A Larsen truss is a lightweight, non-structural added component on a stud wall assembly. It is used to build a thick wall extension for outboard insulation to achieve high R-values. The benefits of the Larsen truss system are its versatility, suitability for retrofits, and cost savings compared to a traditional double stud wall (two 2×4 or 2×6 walls).
This stud wall with Larsen truss is a 2×4 framed wall with 8” deep Larsen trusses built with 2×2 and plywood. (Fun fact: The Larsen truss system was developed by an Edmonton, Alberta builder named John Larsen in 1981.)
The exterior of the wall features:
- SIGA Majvest® 200, vapour-open, wind and rainproof façade membrane
- Larsen trusses with cellulose insulation
- Second layer of SIGA Majvest® 200, this outside layer of WRB retains the cellulose and protects it from liquid water
- Rainscreen
- Hardie® Plank Lap Siding in Arctic White
The interior of the wall features:
- No insulation, 2×4 wall acts as a service cavity
- Drywall
The window installation features:
- Innotech Defender 88PH+ XI window installed off-centre to the interior of the wall
- Delta® Flashing at the sill
- Rockwool Comfortbatt® insulation in the installation cavity, and over-insulation at exterior face and the interior face of the window
- Window is installed using the anchoring method with SIGA Fentrim® 430 grey tape on the four sides of the interior face for air and water sealing. SIGA Wigluv® 60 on the exterior jamb and head for an additional water shedding surface.
- Metal window flashing on all four sides to complement the siding with a metal sloped sill and wood trims
View the interactive 3D Sketchup model. (Best viewed on desktop.)
View the 3D animation.
Wall Assembly #3: Quad-Lock® ICF Wall – R43
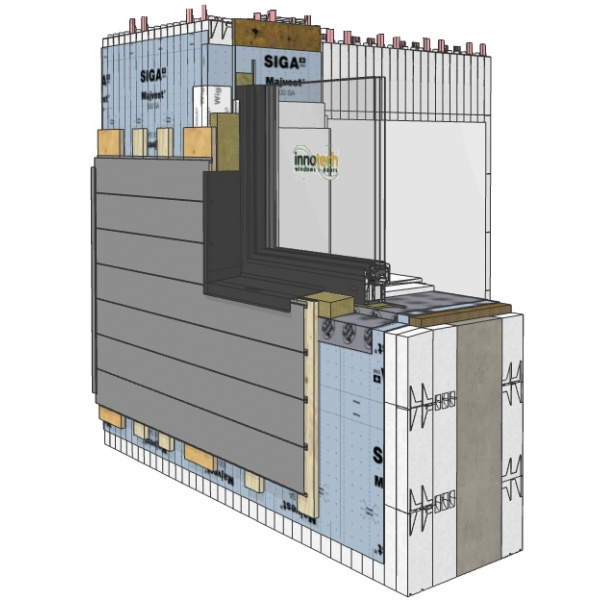
There are many benefits to insulated concrete form (ICF) walls: high R-values with continuous insulation, built-in moisture resistance, high sound transmission resistance, long-term durability with the ability to withstand natural disasters, and reduced construction times.
The following wall assembly with Quad-Lock® insulated concrete form panels provides a true R-value of R43 or U-value of 0.14:
- R-43 Quad-Lock panel made with (non-HBCD fire retardant) EPS
The exterior of the wall features:
- SIGA Majvest® 500 SA – Self-adhering, vapour permeable membrane on exterior wall and window rough opening
- Raincreen
- KBS Paneling System – Wood grain, 24-gauge sheet metal siding from Klassen Building Supplies in Barnwood
The window installation features:
- Innotech Defender 76TS window installed towards the exterior of the wall
- Protecto Sill Pan Flash™ Wrap at the sill
- Rockwool Comfortbatt® insulation in the installation cavity and over-insulation at the exterior sill
- Over-insulation of jamb and head faces, and interior four sides, with (non-HBCD fire retardant) EPS from Airfoam Industries
- Window is installed using the anchoring method with a L-angle, rod & caulk on the interior face for air and water sealing, and SIGA Wigluv® 60 on the exterior jamb and head for an additional water shedding surface.
- KBS Paneling System integrated metal window flashing on all four sides to complement the siding with a metal sloped sill
View the interactive 3D Sketchup Model. (Best viewed on desktop.)
View the 3D animation.
Wall Assembly #4: BOSS Prefabricated Engineered Panels
Innotech windows and doors are ideal for durable prefabricated walls with high R-values:
- Innotech windows and doors have superior air, water and structural performance to complement high-performance prefabricated walls.
- All Innotech products are custom manufactured which allows the windows and doors to be designed for each prefabricated wall or building solution – one size does NOT fit all!
- Innotech windows can, and have been, incorporated into the factory prefab wall assembly process to simplify completion and improve processes.
- For operable windows, the sashes can be removed for shipping and installed on-site. This reduces the risk of damage to the glass during construction and transportation.
- For fixed windows, the insulated glass units (IGUs) can be installed on-site to reduce the risk of damage to the glass during construction and transportation.
- Innotech windows and swing doors are installed using the anchoring method with strap anchors. This installation method provides two important benefits for prefabricated construction:
The anchoring method provides the flexibility to install the window or door anywhere within the wall cavity (rough opening) to achieve the desired overall wall performance, natural ventilation and functionality.
The anchoring method also protects the windows and doors from movement of the walls, including movement during transportation and installation (an important consideration for prefabricated walls or other off-site construction), naturally occurring building settlement, and long-term movements from wind loads and daily operation.
BOSS is an open-source sustainable building system that utilizes prefabricated engineered panels to achieve a very high-level of performance: Passive House. The walls, roofs and floor panels are assembled offsite in a controlled environment with low embodied carbon materials and 100% electric and renewable sources of energy. The result is a highly sustainable construction method that is low-waste, high-quality and affordable.
To learn more about BOSS, visit B Collective Homes.
Building better is all about having the right team, a clear plan, and selecting and installing the most appropriate building materials – including windows and doors – for every project. Let’s talk about your next high-performance project!
Do you love wall assembly mock-ups as much as we do? Here are four wall assemblies presented by Natural Resources Canada, RDH Building Science and BCIT School of Construction and the Environment; the team discusses the pros and cons of the four net-zero ready wall assemblies.
Thank you to Beyond-Code.net for creating the 3D interactive Sketchup models and 3D animations. ![]()
DISCLAIMER These wall assemblies demonstrates one of several possible wall assemblies and may not be appropriate for your project for many reasons, including local regulations or building codes, project specific performance targets, and personal preference. It is the responsibility of the owner, architect or builder to select and install products in compliance with all applicable laws, regulations and building codes.